0%

OCR学习

一 内容梗概:

这个项目一共有两个需要完成的代码文件,一个是gen_printed_char,另一个是Chinese_OCR。

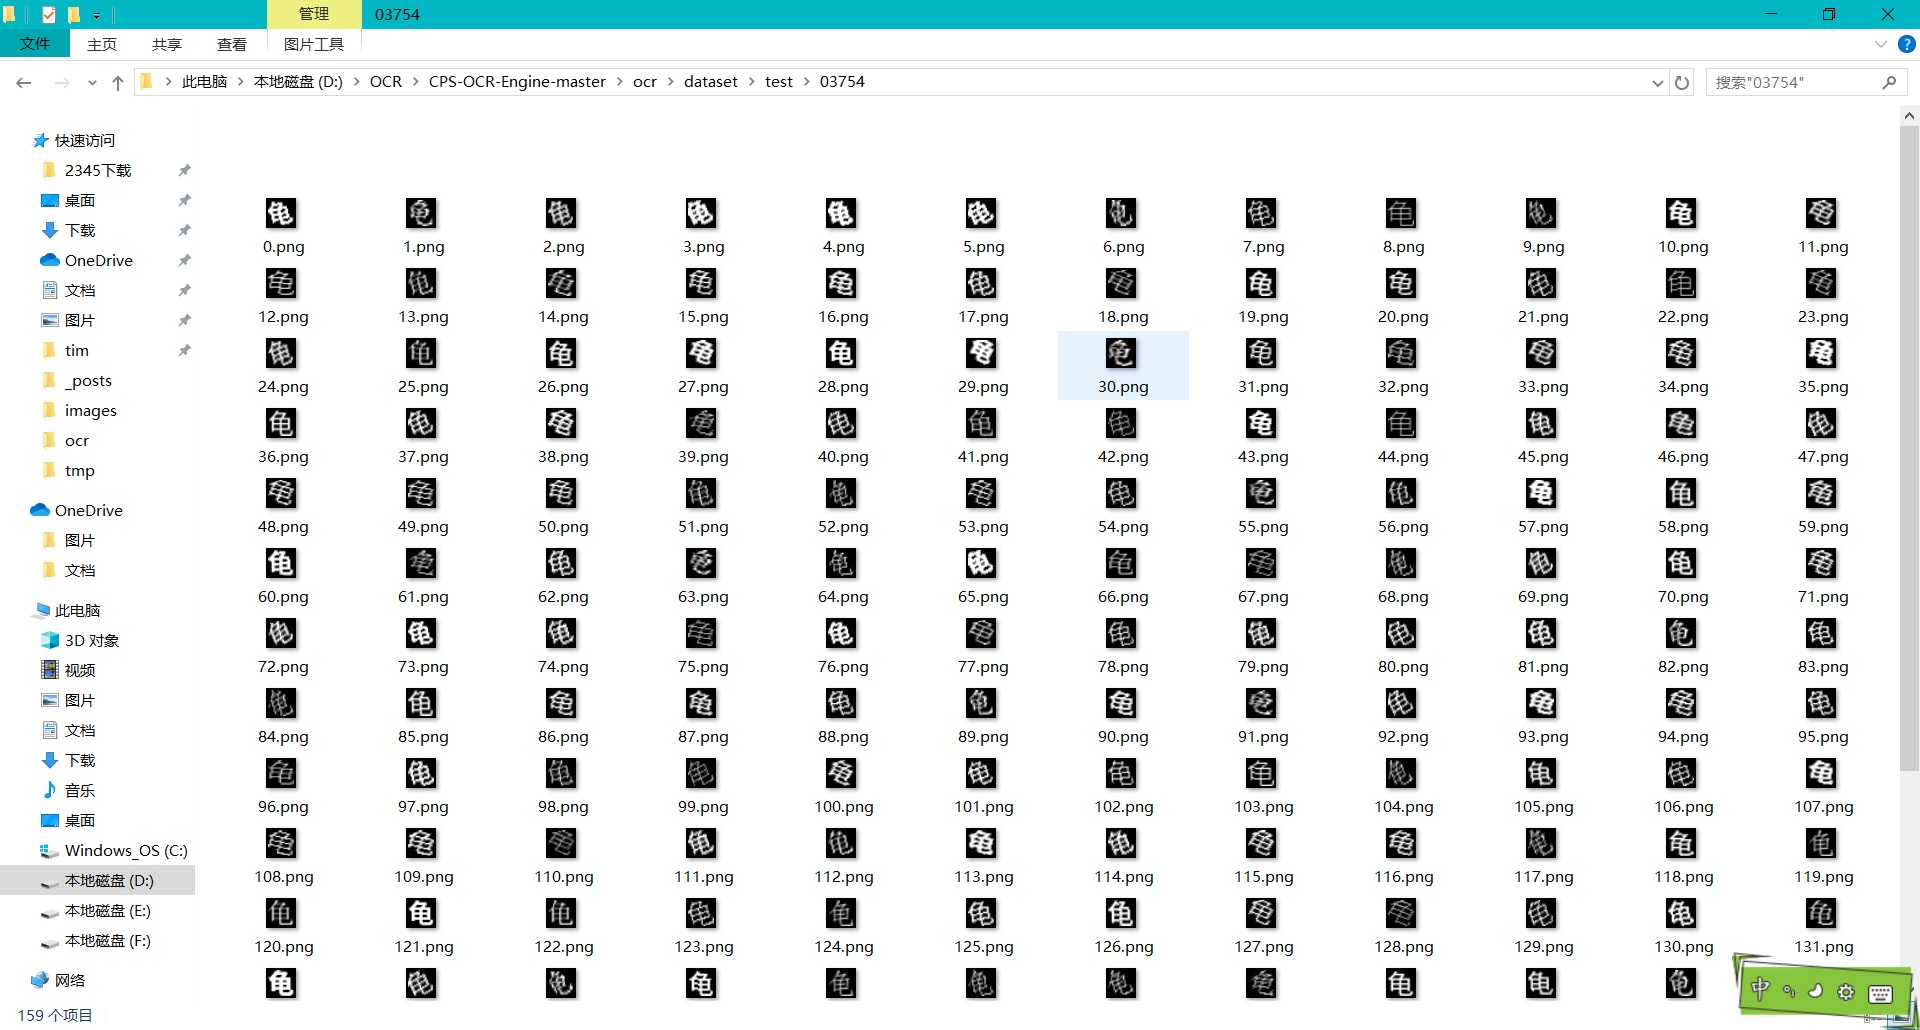
首先gen__printed_char中的代码的核心就是在网上收集字体文件,即存在Chinese_fonts中的内容。进行泛化(泛化应该是将每个字经过旋转偏移形成各种各样的汉字图像)。下图是一个汉字经过泛化后得到的内容。这时候得到了3755个汉字所对应的泛化图像,第一步完成。

20

Chinese_ocr是将第一步中得到的3755个汉字所对应的图像进行训练,最后得到一个分类器,随后将待识别的文字图片扔进tmp文件

二 内容细节:

此部分从 gen_printed_char 的init_main部分说起,类似于c语言中的main函数。

​ 首先将这个文件的调用需要一些参数—即相关最终图像所放置的文件,图像旋转的角度等等,作者用了一个args_parse的包。这个包适合处理要输入大量的参数。此部分相关详细内容我放在了这里

1
2
3
4
5
6
7
8
9
10
11
12
13
14
15
16
17
18
19
20
21
22
23
24
25
26
27
28
29
30
31
32
if __name__ == "__main__":
description = ''' python gen_printed_char.py --out_dir ./dataset \
--font_dir ./chinese_fonts \
--width 30 --height 30 --margin 4 --rotate 30 --rotate_step 1 '''
options = args_parse()
#参数列表中的输出文件位置赋给out_dir 即dataset
out_dir = os.path.expanduser(options['out_dir'])
#参数列表中的字体文件位置赋给 font_dir 即Chinese-fonts Chinese_fonts文件里面是在网上找的各种字体文件 font_dir = os.path.expanduser(options['font_dir'])
#测试比例? 默认等于0.2好像
test_ratio = float(options['test_ratio'])
#图片宽为30 高为30
width = int(options['width'])
height = int(options['height'])
need_crop = not options['no_crop']
margin = int(options['margin'])
#旋转角度 0-45
rotate = int(options['rotate'])
need_aug = options['need_aug']
#旋转步数
rotate_step = int(options['rotate_step'])
train_image_dir_name = "train"
test_image_dir_name = "test"
# 将dataset分为train和test两个文件夹分别存储
train_images_dir = os.path.join(out_dir, train_image_dir_name)
test_images_dir = os.path.join(out_dir, test_image_dir_name)
#判断是否存在这个目录,如果存在,删掉这个目录从新建一个
if os.path.isdir(train_images_dir):
shutil.rmtree(train_images_dir)
os.makedirs(train_images_dir)
if os.path.isdir(test_images_dir):
shutil.rmtree(test_images_dir)
os.makedirs(test_images_dir)

作者定义的类:

1
2
3
4
5
6
7
8
9
10
11
12
13
14
15
16
17
18
19
20
21
22
23
24
25
26
27
28
29
30
31
32
33
34
35
36
37
def args_parse():
# 解析输入参数
#创建一个解析对象
parser = argparse.ArgumentParser(description=description, formatter_class=RawTextHelpFormatter)
parser.add_argument('--out_dir', dest='out_dir',
default=None, required=True,
help='write a caffe dir')
parser.add_argument('--font_dir', dest='font_dir',
default=None, required=True,
help='font dir to to produce images')
parser.add_argument('--test_ratio', dest='test_ratio',
default=0.2, required=False,
help='test dataset size')
parser.add_argument('--width', dest='width',
default=None, required=True,
help='width')
parser.add_argument('--height', dest='height',
default=None, required=True,
help='height')
parser.add_argument('--no_crop', dest='no_crop',
default=True, required=False,
help='', action='store_true')
parser.add_argument('--margin', dest='margin',
default=0, required=False,
help='', )
parser.add_argument('--rotate', dest='rotate',
default=0, required=False,
help='max rotate degree 0-45')
parser.add_argument('--rotate_step', dest='rotate_step',
default=0, required=False,
help='rotate step for the rotate angle')
parser.add_argument('--need_aug', dest='need_aug',
default=False, required=False,
help='need data augmentation', action='store_true')
args = vars(parser.parse_args())
return args
#返回的args已经形成了一个字典调用相应的名称就可以调用相应参数

20

1
2
3
4
5
6
# 注意,chinese_labels里面的映射关系是:(ID:汉字)
def get_label_dict():
f = open('./chinese_labels', 'rb')
label_dict = pickle.load(f, encoding="utf-8")
f.close()
return label_dict

Chinese_labels文件是作者按照字典即哈希表样式 每个字对应一个数字 例如 “0 对应着 一,1对应着 丁”,

然后为了便于存储 用pickel模块进行封存,直接打开是乱码,但经过pickel导入就显示内容。21

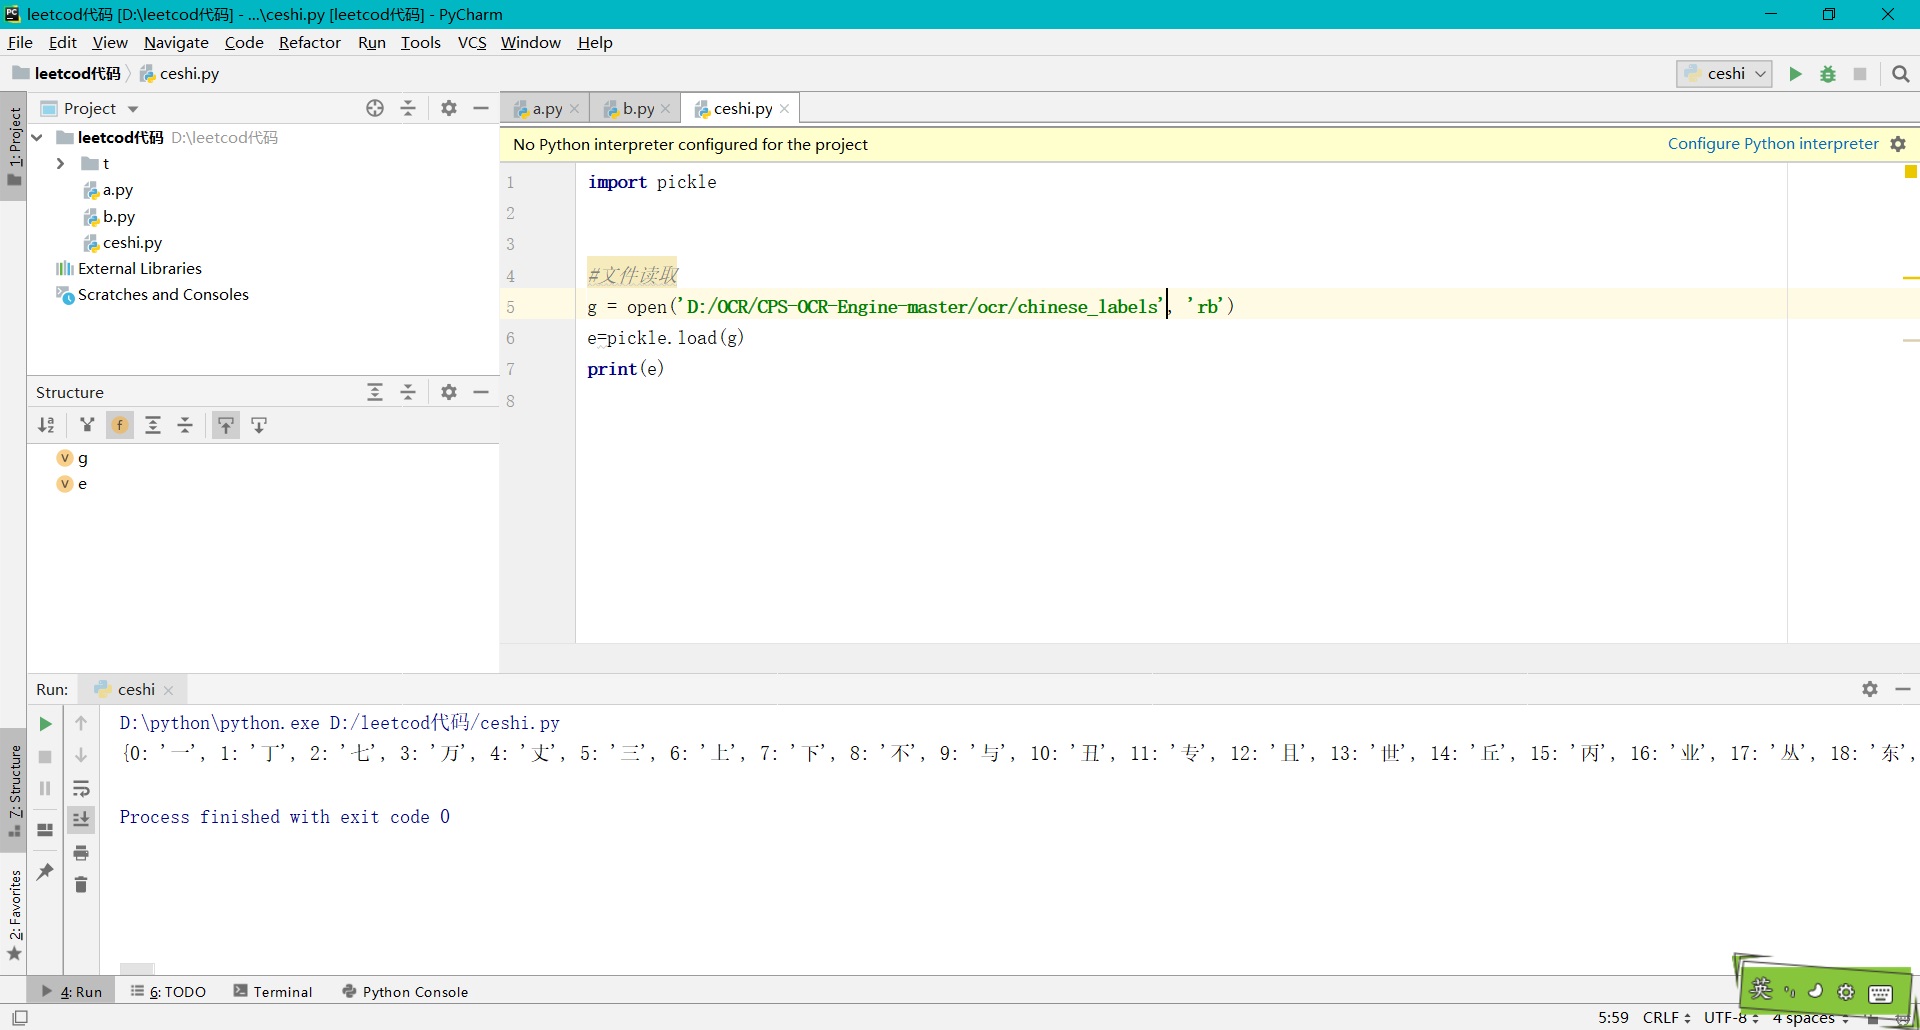
但作者在后面会进行翻转,即汉字对应着·某个数字

1
2
3
4
5
6
7
8
9
label_dict = get_label_dict()
char_list = []
# 汉字列表
value_list = []
# label列表
for (value, chars) in label_dict.items():
print(value, chars)
char_list.append(chars)
value_list.append(value)

对于输入的角度不是45吗,然后作者从-45~+45这些角度都进行了添加,即正方向反方向各歪了45

1
2
3
4
5
6
7
8
9
if rotate < 0:    
roate = - rotate
if rotate > 0 and rotate <= 45:
all_rotate_angles = []
for i in range(0, rotate + 1, rotate_step):
all_rotate_angles.append(i)
for i in range(-rotate, 0, rotate_step):
all_rotate_angles.append(i)
# print(all_rotate_angles)

对于每个字体文件进行看是否能用

1
2
3
4
5
6
7
# 对于每类字体进行小批量测试
verified_font_paths = []
## search for file fonts
for font_name in os.listdir(font_dir):
path_font_file = os.path.join(font_dir, font_name)
if font_check.do(path_font_file):
verified_font_paths.append(path_font_file)
1
2
3
4
5
6
7
8
9
10
11
12
13
14
15
16
17
18
19
20
21
22
23
24
25
26
27
28
29
检查字体文件是否可用
class FontCheck(object):
def __init__(self, lang_chars, width=32, height=32):
self.lang_chars = lang_chars
self.width = width
self.height = height
def do(self, font_path):
width = self.width
height = self.height
try:
for i, char in enumerate(self.lang_chars):
img = Image.new("RGB", (width, height), "black") # 黑色背景
draw = ImageDraw.Draw(img)
#字体大小为宽的0.9倍
font = ImageFont.truetype(font_path, int(width * 0.9), )
# 白色字体
draw.text((0, 0), char, (255, 255, 255), font=font
#getdata是看着图像的3个rgb值
data = list(img.getdata())
sum_val = 0
for i_data in data:
sum_val += sum(i_data)
if sum_val < 2:
return False
except:
print("fail to load:%s" % font_path)
traceback.print_exc(file=sys.stdout)
return False
return True

关于pillow模块的使用可以参照另一篇文档

在上面检测完每种字体文件都可以用之后,下面是生成字体图像的函数,首先与检测文件一样,用pillow生成单独的字与黑色背景,然后组合起来,再然后检测这张图片中这个汉字的最小矩形。

1
2
3
4
5
6
7
8
9
10
11
12
13
14
15
16
17
18
19
20
21
22
23
24
25
26
27
28
29
30
31
32
33
34
35
36
37
38
39
40
41
# 生成字体图像
class Font2Image(object):

def __init__(self,width, height, need_crop, margin):
self.width = width
self.height = height
self.need_crop = need_crop
self.margin = margin

def do(self, font_path, char, rotate=0):
find_image_bbox = FindImageBBox()
# 黑色背景
img = Image.new("RGB", (self.width, self.height), "black")
draw = ImageDraw.Draw(img)
font = ImageFont.truetype(font_path, int(self.width * 0.7), )
# 白色字体
draw.text((0, 0), char, (255, 255, 255),font=font)
if rotate != 0:
img = img.rotate(rotate)
data = list(img.getdata())
sum_val = 0
for i_data in data:
sum_val += sum(i_data)
if sum_val > 2:
#将data中的rgb有numpy数组进行操作
np_img = np.asarray(data, dtype='uint8')
#取rgb不是三列吗,取第一列组成一维数组
np_img = np_img[:, 0]
#reshape就是height行 ,width列 就是只让r 代替原来的data,这步应该是为了简化计算量 只药了了r的值,然后中间嵌套的检测图像里的汉字的最小矩形
np_img = np_img.reshape((self.height, self.width))
cropped_box = find_image_bbox.do(np_img)
left, upper, right, lower = cropped_box
np_img = np_img[upper: lower + 1, left: right + 1]
if not self.need_crop:
preprocess_resize_keep_ratio_fill_bg = \
PreprocessResizeKeepRatioFillBG(self.width, self.height,fill_bg=False,margin=self.margin)
np_img = preprocess_resize_keep_ratio_fill_bg.do(np_img)
# cv2.imwrite(path_img, np_img)
return np_img
else:
print("img doesn't exist.")

中间需要查询的资料:

getdata函数

try—except解释

numpy.shape函数

numpy.reshape函数

1
2
3
4
5
6
7
8
9
10
11
12
13
14
15
16
17
18
19
20
21
22
23
24
25
26
27
28
29
30
31
32
33
34
35
36
37
# 查找字体的最小包含矩形
class FindImageBBox(object):
def __init__(self, ):
pass

def do(self, img):
# 获取 图片的高和宽
height = img.shape[0]
width = img.shape[1]

v_sum = np.sum(img, axis=0)
h_sum = np.sum(img, axis=1)
left = 0
right = width - 1
top = 0
low = height - 1
# 从左往右扫描,遇到非零像素点就以此为字体的左边界
for i in range(width):
if v_sum[i] > 0:
left = i
break
# 从右往左扫描,遇到非零像素点就以此为字体的右边界
for i in range(width - 1, -1, -1):
if v_sum[i] > 0:
right = i
break
# 从上往下扫描,遇到非零像素点就以此为字体的上边界
for i in range(height):
if h_sum[i] > 0:
top = i
break
# 从下往上扫描,遇到非零像素点就以此为字体的下边界
for i in range(height - 1, -1, -1):
if h_sum[i] > 0:
low = i
break
return (left, top, right, low)

对于每个字的每种字体都先生成一副正常30x30的图像,如果开始是输入的倾斜角度部位0就加大力度生成每个字每种字体每个角度都有一副图像,这个的量就是3755x13x90个图片,然后按照训练比例,我输入的是0.2,就是图片总量的0.2为训练样本,剩余的0.8为测试样本,由此gen_printed_char函数搞完了。

1
2
3
4
5
6
7
8
9
10
11
12
13
14
15
16
17
18
19
20
21
22
23
24
25
26
27
28
29
30
31
32
33
34
35
36
37
38
font2image = Font2Image(width, height, need_crop, margin)

for (char, value) in lang_chars.items():
# 外层循环是字
image_list = []
print(char, value)
# char_dir = os.path.join(images_dir, "%0.5d" % value)
for j, verified_font_path in enumerate(verified_font_paths):
# 内层循环是字体
if rotate == 0:
image = font2image.do(verified_font_path, char)
image_list.append(image)
else:
for k in all_rotate_angles:
image = font2image.do(verified_font_path, char, rotate=k)
image_list.append(image)

if need_aug:
data_aug = dataAugmentation()
image_list = data_aug.do(image_list)

test_num = len(image_list) * test_ratio
random.shuffle(image_list) # 图像列表打乱
count = 0
for i in range(len(image_list)):
img = image_list[i]
# print(img.shape)
if count < test_num:
char_dir = os.path.join(test_images_dir, "%0.5d" % value)
else:
char_dir = os.path.join(train_images_dir, "%0.5d" % value)

if not os.path.isdir(char_dir):
os.makedirs(char_dir)

path_image = os.path.join(char_dir, "%d.png" % count)
cv2.imwrite(path_image, img)
count += 1

20